Examination of the Eye
Preparation and Introduction
General Inspection
An acronym we use at St George's is 'SAFMAF'. This is used to remember the steps of the eye examination!
SAFMAF
S- ight
A- cuity
F - ields
M - ovements
A - ccomodation
F – undoscopy
- Introduce yourself to the patient and explain the procedure of the examination to them.
- Obtain informed consent
- Wash hands
General Inspection
- Look for any obvious eye changes or assymetry between the two eyes.
An acronym we use at St George's is 'SAFMAF'. This is used to remember the steps of the eye examination!
SAFMAF
S- ight
A- cuity
F - ields
M - ovements
A - ccomodation
F – undoscopy
Sight
- Ask the patient if they can see. You can ask them if they can see the clock on the wall or ask them to read something.
Visual AcuityThe Snellen chart is used to test visual acuity. This is normally read by the patient when standing 6m away from the chart. Ask the patient to read the lowest possible line that they can.
Recording of Acuity - This compares what the patient can see at 6m with what distance this can normally be read at. For example, The top letter can be read by a normal eye at 60m, second at 36m and third at 24m. A recording of 6/36 means that the patient is able to read at 6m what is normally read at 36m, meaning that the patients vision is worse than normal. On the other hand a recording of 6/5 means that their vision is better than normal where 6/6 is normal. |
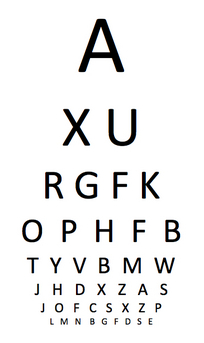 A Snellen Chart
(created by myself) |
If the patient cannot read the Snellen chart at all:
Counting Fingers at 1m - Hold up a number of fingers and ask the patient to tell you how many they can see. "How many fingers can you see?". If they answer correctly, record as VA=CF at 1m.
Hand movements at 1m - Move your hand in a certain way and ask the patient to tell you what you are doing. " What am i doing with my hand?"
Perception of light - use a pen torch and shine the light asking the patient to point to where the light is coming from.
Visual Fields
Start by checking for visual inattention. This is a common problem patients can experience after a stroke which causes them to ignore one side of the body.
Visual Fields
- Seat yourself 1m away and opposite your patient at eye level
- Ask patient to keep both eyes open and fix their eyes on your nose or eyes.
- Outstretch your hands midway between you and your patient
- Start at the top by doing large hand movements and asking the patient to point to which hand they see moving.
- Test the middle and lower visual fields by moving your hands downwards and repeating the movements
- You can do large hand movements initially and then do smaller finger movements
- Move your right hand, left hand and then both together, asking patient to point at the hands they see moving
Visual Fields
- In the same seated position, ask the patient to cover one eye. You should also cover the same eye as a mirror image so that you can make comparisons with what you and the patient see.
- Ask the patient to keep their eyes fixed on your eyes or nose. Tell them that you will slowly bring your finger into their vision and ask them to report when your finger comes into their vision. (A white neurotip can also be used instead).
- You can wiggle your finger slowly inwards from each quadrant. Your hands should be midway between you and your patient.
- Try to map out the patients visual field and record findings.
Blind spot
- Ask the patient to still keep their vision fixed on your eye or nose
- Using a neurotip, start from the middle of the field, by placing the neurotip midway between you and your patient
- Slowly move the neurotip outwards asking the patient to report when the neurotip disappears and reappears in their peripheral vision.
- When the patient reports that it has disappeared, move the neurotip upwards and downwards and map out the blindspot according to what the patient reports.
Eye Movements
This is a test of the 3 cranial nerves which supply the extraocular muscles of the eye. (CN III, CN IV, CN VI).
- Start by looking at the patients eyes for any obvious abnormalities, such as deviation or nystagmus.
- Check for symmetry of corneal light reflexes - ask the patient to look straight ahead whilst you shine a light directly in their line of sight. Check for a bright spot of reflection on both eyes. This should be symmetrical. If this is not the case, this may confirm a suspected 'squint'.
- Ask the patient to keep their head still and follow your finger with their eyes. Move your finger slowly.
- Using a full double H pattern, test the range of all the extra-ocular muscles. Keep the H pattern within 1m as above this can distort vision
- Ask the patient to report any double vision they experience
- Look out for nystagmus – a repetitive and involuntary movement of the eye. This consists of a slow drift of the eye in one direction followed by a fast correction in the other direction. It is seen as a jerky movement
- Testing for Nystagmus – Whilst asking the patient to follow your finger again, move your fingers up and down in the shape of a cross and look out for nystagmus and note the direction of the jerk. Horizontal nystagmus can be caused by cerebellar disease. If there is a unilateral lesion, the jerk is towards the side of the lesion.
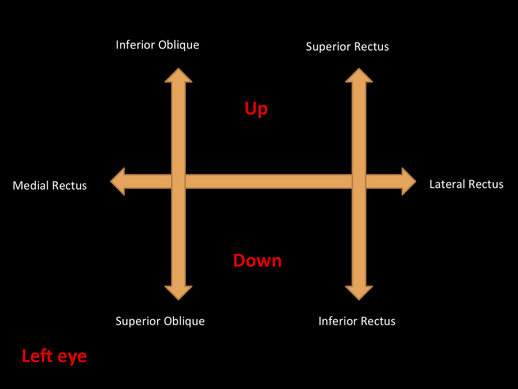
A diagram which i have made showing the H pattern when testing eye movements. This shows the muscles which are being tested which each direction of movement.
.
Pupil Reactions
Look for asymmetry in the size of the pupils or any irregularity of the eyes
Direct and consensual reaction
- Shine the light into the right eye, approaching the patient from the right side.
- Look out for the constriction of the right eye – This is the direct reaction
- Also observe the constriction of the left eye – This is the consensual reaction
- Repeat this again by switching the eye and shining the light in the left eye and checking both left and right eye for the direct and consensual reactions.
Swing test
Testing the right eye
- Shine the light in the right eye to start with and look for constriction of the pupil.
- Move the light over to the left eye – This should constrict als
- Swing the light back into the right eye – This should constrict again, if normal
- Repeat this to test the left eye
- Abnormal swing test
Afferent nerves can be affected which can cause an abnormal result. When the light is shone into the affected eye repeatedly whilst alternating with the opposite eye, the pupil of the affected eye will dilate instead of constricting. This is due to a weak direct reflex in the affected eye.
A video showing the pupillary reflexes: Direct and consensual reactions and the Swing test
Accommodation
- Ask the patient to look at a point in the room, as far as possible
- Then, ask them to look at object which you present to them about 20cm infront of their eyes
- Look for constriction of the pupils - this is normal
Fundoscopy
The patient should be seated so that you can access both sides of their chair to examine both eyes. The light level should be lowered slightly if possible and if either you or the patient wear glasses, these should be removed.
- Examine the patient’s right eye with your right hand
- Ask the patient to look straight ahead and slightly above eye level
- Approach the patient from their right side, bringing your head and opthalmoscope slowly closer to the patient’s eye
- The red reflex should be seen at 30cm. This is a reflection of the light beam by the retina.
- Place your thumb on the patient’s right eyebrow and move closer until your head is within 1-2 cm of your thumb.
- Blood vessels should now be visible. Follow one of these vessels until you reach the optic disc.
|
Examining structures in the retina:
Optic disc:
Quadrants of the retina: Locate the blood vessels in each quadrant. The arteries are narrower and paler than the veins, which are wider and redder.
|
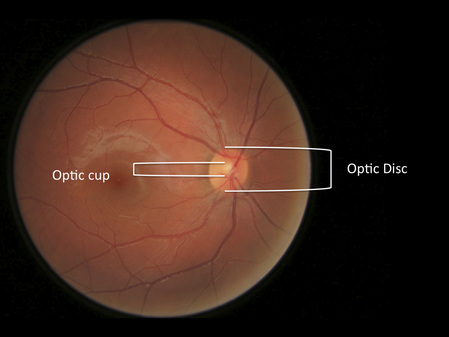 The diagram above is a labelled image of my retina showing the Optic disc and Optic cup. The ratio is normal and <0.5
|
Examining the Macula:
- the light intensity of the opthalmoscope should be reduced slightly and the patient should be asked to look directly into the light.
- Look for scars, exudates and any blood vessels.
- Now move on to examine the patients left eye. This needs to be done using your left hand and approaching the patient from their left side
- Repeat all the above steps for examining the left eye also.
Below is a video showing the Opthalmoscopic examination and the structures which need examining in the retina
- This is now the end of the examination. Thank the patient and put away the ophthalmoscope and other equipment that was used.
- Record and report findings.
